
I have written about how good Dungeons & Dragons random encounter tables are before, both in this blog and in issue 7 of my zine.
In this post I want to respond in a way to a video I watched where the host was explaining how bell-curve random tables are not truly random and shouldn’t be used. A single die with a way to roll higher than the max would be better.
I both agree and disagree with this notion.
It all comes down to what you want to get out of the table and what area in your campaign world the table is for.
Let’s dive into it.
If you don’t understand (or haven’t really thought about) the odds when rolling dice in D&D, then I have explained this a little before.
But, simply put, using a single die when rolling gives you the same odds of any one number coming up. Rolling a nat 20 on a D20 is 5% – the same as rolling a 13. Or any other number.
When you roll two dice and add them together, you get what’s called a bell curve effect (you can see what I mean on this odds site).
As far as our random tables go, this means that some results are more likely than others when rolling two dice.
There is a big difference in odds between a single D20 and 2D10.
And this is a good thing as it gives you options.
Using both of these tables can give you more options and better random encounter tables, which will add verisimilitude to your campaign world.
I use both types of tables but in different areas of my campaign world.
Using Party Level
Before I get into that however, there is a way you can single die tables to good effect if you are worried about keeping the encounters optimised for your party’s level (this isn’t really necessary but some GMs want to do this).
Simply create 11 encounters with the easiest (lowest CR) being in number 2 spot (there is no number 11 spot and you will see why in a minute), and then add increasingly higher CRs in the higher spots on the table, making sure spots 2-7 are tailored for their level and spots 8-11 are for higher level characters.
Here is a quick example for a low-level party.
Table: Random Encounters (Area Around Ruin)
| D6 | Encounter |
| 2 | D4 Kobold Scouts |
| 3 | Wild Boar |
| 4 | 2D4 Goblin Infiltrators |
| 5 | 2D4 Bandits |
| 6 | D3 Ghouls |
| 7 | 2D4 Wolves |
| 8 | D6 Satyrs |
| 9 | Leucrotta |
| 10 | D4 Owlbears |
| 11 | Wight |
| 12 | Lammasu |
You then simply roll a D6 and add the average party level to the result. For parties up to 6th level, this works well.
For example, a random encounter is called for and you roll a 3, adding 2 (the party’s level) to the result to get a 5. Later on, you roll a 6, adding 2, to get an 8 – a tough encounter but one the PCs could deal with if they play smart.
Back to where to use both types of tables.
Using Regions in your Campaign World
I tend to use the bell-curve type table in more civilised regions of my campaign world, or in areas where a particular monster dominates.
For example, the civilised areas around the city-state of Myrbridge is well patrolled and so patrols, travellers along the road, and merchant traffic would be encountered way more often than any monsters.
Having said that some monsters do sometimes hunt or use hit-and-run tactics in these areas (but leave before stiff resistance arrives), but these are rare.
An example encounter table around Myrbridge.
Similarly, in areas which are dominated by a particular type of monster or culture, I would use bell-curve tables.
In issue 7 of my d12 Monthly zine I showcase a random encounter table in a region where there are two major barbarian tribes. You can see the table below.
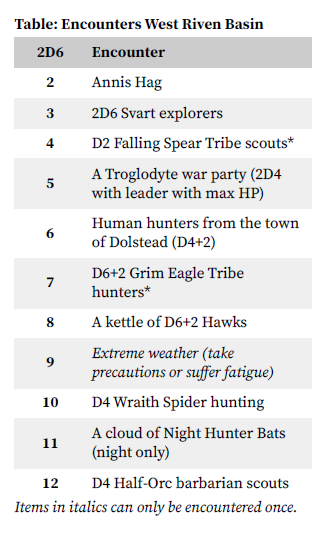
As you can see, spots 6-8 (the most often rolled) have locals in those spots: human hunters from a nearby town, barbarian tribesmen, and eagles (which are common in the area thanks to mountainous eyries and the barbarians breeding them).
This makes sense.
Giving the Annis Hag the same odds of being encountered as some tribesmen is unrealistic.
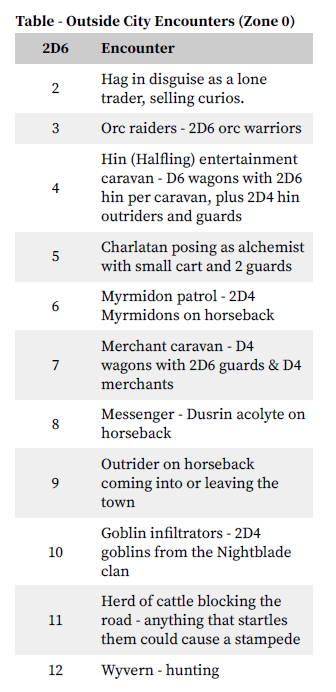
In border or wild regions of my world, I tend to stick to the single die for encounter tables.
In the wilderness there can be many different dangers and each of these can have a more likely equal chance of being encountered.
This is where I would use the single D6 with 12 spots. But I wouldn’t use level to add to the result. I would use zones.
Using Regional Zones
Each region or area of my world has an associated with a particular zone.
Zones range from 0 (highly civilised and patrolled areas) to 6 (highly wild and dangerous areas).
When I develop an area, I give it a zone number.
For example, the patrolled areas around a frontier stronghold might be zone 0, while a frontier region might be 2 or 3. Meanwhile, a true wilderness area would be 4 or 5. The area around Mt Doom would be zone 6.
It is this zone number that I add to the die roll to see which encounter the PCs run into.
If they are just outside the stronghold, I roll a simple D6. If they are just outside Mt Doom, then I add a 6 to the result.
Generally, the same rule applies to adding encounters on the table – easier encounters go first (filling up the lower numbered spots), followed by increasingly dangerous encounters in the higher numbered spots.
However, I also keep in mind what animals and monsters are found in that area as well.
This means, there is more chance of encountering a beholder near Mt Doom than in the wilds around it, and no chance close to the stronghold.
This gives the PCs a sense of where the dangerous areas are by reinforcing it via the encounters they have.
It also allows you to see at a glance how dangerous an area is so you can telegraph that to your players.
Tied this together with the table I put together on what the creatures you roll up are actually doing when encountered, your random encounters can easily come alive and add to your world.
While You’re Here…
Since 2021 I have been publishing a monthly zine, which has a ton of articles for any edition of Dungeons & Dragons.
They are also available on DriveThruRPG and printed copies are available via my Patreon.
I also have a growing Discord, where you can join in on my regular West Marches campaign.
I will also be releasing some more products in the near future, like several monster manuals and a series of soloRPG publications.
Feel free to reach out to me on Twitter any time.
While You’re Here…
Since 2021 I have been publishing d12 Monthly, a monthly zine, which has a ton of articles for any edition of Dungeons and Dragons.
Printed copies are available in my store. The PDF is available on DriveThruRPG and you can get both, plus support my work, via my Patreon.
I will also be releasing some more products in the near future.
Feel free to reach out to me on Twitter or my contact page any time.
I knew exactly which YouTube video on random encounters and using 2d6 for them you were referring to before I even clicked the link. That video, when I saw it about two weeks ago, left a very big impression on me.
Good or bad? 🙂
Oh, very good. I especially liked the point about having three tables for the random encounter – the creature(s) you meet, what they’re doing, and a complication for them. This was new to me at the time.
Nice. Yeah, the table about what they are doing when encountered has helped a lot.
The “add danger rating to roll” can also be done with a 2d6 table. You do have to populate the low numbers with “safe” encounters (like “peasants gathering firewood”, not hags).
I also add into the extended slots (e.g. slot 14 on 2d6) things like “roll from adjacent zone”.
Another tip is to roll more often, but to then roll as to mode of the event, i.e. actual encounter, or signs/spoor/tracks. The odds of an actual encounter (and probable quantity) stays the same, but now the DM has more opportunities to foreshadow.
All great additions there, Eric. My next post will touch on using signs/tracks/etc to add to this concept.
I do like the roll from adjacent zones though – I will incorporate that in.
Russ